Sync with Office
Did not find what you are looking for? Try returning to the installation.
Sync with Office – Add-in installation
Sync the app with Office to take full advantage of its potential. Let’s find out more about its benefits and how to make it work.
The main benefits of synchronization with Office
- Synchronizing screenshots with your Office documents makes it easy to use the visual materials of the app in your presentations, worksheets, and other documents.
With this feature, you can easily insert screenshots created while working with our 3D models into your teaching preparations. It is up to you whether you want to use the preparations you have been using for years or create brand new documents.
-
By syncing your documents with the 3D models in the app, your teaching materials become not only visually attractive but also interactive. Each screenshot includes a link allowing you to open the 3D model directly in the app.
-
Not only teachers will benefit from the synchronization with Office. Your students will find it a valuable aid when working on reports, presentations, or homework.
How to sync the app with Office?
To synchronize the visual content of our app with your teaching materials in Office, you first need to install an add-in.
Before you start with the installation, make sure add-in installation is enabled for the Microsoft accounts of your organization. Your IT admin will help you with this. Our guide to add-in deployment will guide him through it.
Now let’s finally have a look at how you can sync Office and our 3D app. Synchronization requires activating a special add-in in your Office. The process is identical for both Corinth and Lifeliqe (Corinth online).
Have a look at the following video and detailed instructions below:
A) If you use the online version of Office
(Applies for Office 365)
1. Open the add-in page in Microsoft AppSource:
- Corinth Screenshots: Add-in page for offline application
- Lifeliqe Screenshots: Add-in page for online application
2. Click the GET IT NOW button to automatically install the add-in into your OneNote (only available for the online version of the app), Word, and PowerPoint tools.
3. Once the installation is complete you will be redirected to a new page allowing you to also install the add-in into your offline Office tools.
4. If you use both the online and offline versions of Office, click the Open in Word or Open in PowerPoint button to install the add-in to both Office tools.
5. Now you need to sync the app with the add-in. Open the app, choose the Sync with Office option from the main menu.
6. Click the Generate button and copy your add-in code.
7. Open any Office product and click the add-in icon on the right side of the Home tab.
8. Enter your add-in code and click the Connect button.
B) If you use the offline version of Office
(Applies for Office 2013, 2016, 2019, Office 365)
1. Open the add-in page in Microsoft OfficeStore:
- Corinth Screenshots: Add-in page for offline application
- Lifeliqe Screenshots: Add-in page for online application
2. By clicking the Open in Word or Open in PowerPoint button, the add-in will be installed automatically to both Office products.
3. Now you need to sync the app with the add-in. Open the app and choose the Sync with Office option from the main menu.
4. Click the Generate button and copy your add-in code.
5. Open any Office product and click the add-in icon on the right side of the Home tab.
6. Enter your add-in code and click the Connect button.
Great! You have successfully installed the add-in. All information on how to work with the add-in can be found in our user manual.
Also, don't forget to check out our video tutorial!
Note: In the offline version of the app, you can export your screenshots to a PowerPoint presentation without having to sync the app with Office. Simply click the PowerPoint button in the Share panel and your screenshot will open in a new PowerPoint presentation. However, this option is not available when the app is actively synced to Office. To use it, you must stop the sync.
You can also keep using the previous version of our Office add-in. However, this version is no longer supported or updated with new content. Therefore, we recommend updating to the latest add-in version.
Add-in deployment for IT admins
Use the five following steps to simply deploy the add-in to chosen users within your organization.
1) Sing into the Microsoft Admin Center using your admin account. Make sure your display language is set to English.
To change the display language:
- Open the My account menu and click the
 icon in the top right corner.
 - Click on Language and time zone and select the English option.
- Confirm by clicking the Save button
2) Open the Add-ins menu and click Deploy Add-in.

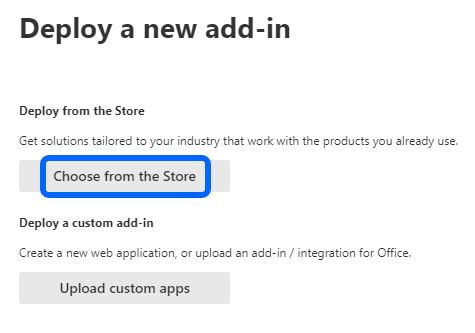
3) In the newly opened window, click Next. Then select the Choose from the Store option.
4) Search for the add-in and click the Add button.

5) Select whether you wish to deploy the add-in for Everyone within the given domain or only for Specific users / groups. Confirm by clicking the Save button.

Great! The add-in is now available for all the chosen users. Refer to our installation manual to learn how to install the add-in. For the online version of Office 365, the add-in will be installed automatically.
Microsoft Teams
A) Share to Teams
Learn how to easily share 3D models with your digital classroom using our Teams integration:
Integration to Google Classroom is also available and works in a similar fashion!
B) Teams plugin
Browse through our learning content and share it with your students without having to leave the Teams interface! All you need is our Teams plugin: